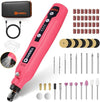
Transform Your Garden with Hardell Rotary Tool: How to Create a Beautiful Trellis For Your Home

Do you want to transform your garden into a beautiful and inviting outdoor space? With the right tools and supplies, it's easy to create a stunning trellis that will add an extra layer of beauty and charm to your home.
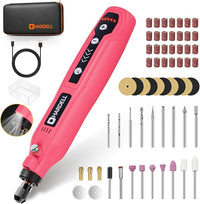
The Hardell rotary tool is one such essential piece of equipment for any DIY project involving woodworking or metalworking. This versatile tool can help you craft intricate designs with ease, making it perfect for creating a custom trellis in no time!
Read on to find out how this handy device can help you bring your vision for your garden to life.
Materials Need
- Hardell 2210 4V Mini Cordless Rotary Tool
- Sanding Bands/Sanding Paper (Polishing and Smoothing)
- Diamond Bits (Engraving/Carving)
- Saw
- Brushes And Wire Brushes (For Cleaning)
- Wooden Boards and Chips
- Nails And Screws (For Affixing the Boards)
- Paint/Stain/Varnish (For Finishing) and Glue (For Adhering the Boards)
- Safety Gear (Gloves, Goggles, Dust Mask)
Guideline For Using the Hardell Rotary Tool for A Garden Trellis Project
The Hardell rotary tool is a great tool for making a beautiful, customized garden trellis. Here are some guidelines to help you get the most out of your Hardell rotary tool when creating a trellis:
Step 1: Prepare Your Materials
Before you begin, make sure to gather all of the materials needed for your trellis project. You will need wooden boards and chips, nails or screws, paint or stain, sanding bands and/or sandpaper, diamond bits, and brushes and wire brushes.
It is important to select quality materials that are resistant to rot, decay, and weathering so that your trellis can stand up to the elements.
Step 2: Cut the Wooden Boards
To cut the wood, measure and mark the pieces you will need for your trellis using the measuring tape and pencil. Then, use a saw to carefully cut the wood to the right size and shape. A Hardell rotary tool can also be used to make the edges smooth.
When cutting the wood, be sure to wear protective gloves and eyewear, and take your time to ensure accurate cuts. It's also a good idea to label each piece of wood so you can easily assemble your trellis later on.
Once all your wood pieces are cut, you can move on to the next step in building your garden trellis.
Step 3: Assemble the Trellis
Once your boards are cut to size, use nails or screws to secure them together in whatever design you desire. Make sure that all connections are tight and secure in order for your trellis to be sturdy enough to last a long time.
Step 4: Polish Your Workpiece
Attach sanding bands or sandpaper onto the chuck of the Hardell Rotary Tool in order to give your workpiece a smooth finish.
Use this tool to remove any imperfections from the surface area before moving on to carving and engraving details into it.
Step 5: Engrave Designs onto Your Workpiece
Before engraving the designs onto the workpiece, it's essential to have a clear plan in mind. You can sketch the design on paper first and then transfer it onto the workpiece.
With diamond bits attached to the chuck of your Hardell Rotary Tool, begin by lightly tracing the design onto the workpiece with the tip of the rotary tool. Then, gradually deepen the cuts to achieve the desired depth and detail.
The diamond bits will easily engrave wood regardless of their toughness level or density.
Step 6: Clean Up
Now it’s time for some cleaning! Use brushes and wire brushes with the Hardell Rotary Tool in order to remove any dust or debris from your workpiece before applying paint or stain.
This step is essential if you want a clean, professional finish for your trellis project.
Step 7: Paint/Stain Your Trellis Project
For an extra layer of charm and character, use paint or stain on your finished trellis project using either a brush or sprayer, depending on how much coverage you want.
With this final step completed, you now have an impressive garden feature that will be sure to impress your guests.
Safety Tips
- When working on any DIY project involving the Hardell Rotary Tool, it is important to keep safety in mind. Here are some tips for using the Hardell Rotary Tool in your garden project:
- Always wear safety goggles to protect your eyes from debris that could be thrown off by the rotary tool.
- Wear protective gloves to prevent any skin irritation or cuts when handling the rotary tool and its attachments.
- Use a dust mask to protect your lungs from harmful particles generated during cutting and sanding activities.
- Securely clamp down larger pieces of wood or metal onto a stable surface with clamps while using the rotary tool on them in order to ensure they do not move unexpectedly while being worked on, which can lead to injuries or property damage.
- Ensure that you are using appropriate accessories and attachments for each job, as not all tools are compatible with every material or project type.
- Start up the rotary tool at a low-speed setting before gradually increasing as necessary for each job, as higher speeds can cause excessive vibrations, which can lead to fatigue or discomfort over time.
- Use light pressure when manipulating materials with the Hardell Rotary Tool in order to avoid overworking them, which can lead to mistakes or damage due to excessive force being applied on delicate components such as intricate carvings or engravings.
- Always remember to store your Hardell Rotary Tool safely in an upright position away from flammable objects and out of reach of children when not in use!
Case Studies: Home Decoration with Hardell Rotary Tool
Decorating your home with the Hardell Rotary Tool can be a fun and exciting way to add life and character to any room. With its versatile design and durable construction, you can use it to create a wide array of DIY projects, such as unique wall hangings, furniture pieces, and decorative accents. Let’s take a closer look at how you can use the Hardell Rotary Tool to spruce up your home décor!
Case Study 1: Wall Art
Using the Hardell Rotary Tool with sanding bands or diamond bits, you can easily carve patterns into wood or metal components in order to craft an original piece of wall art for your living room. Attach the workpiece to your rotary tool's chuck and carefully start removing material from it until you achieve the desired design.
Then, attach a brush attachment onto the chuck in order to remove any dust or debris from its surface before applying paint or stain for extra flair. Mount these pieces of art on your walls for personalized decor that will no doubt have guests commenting on its uniqueness!
Case Study 2: Furniture Upcycling
Transform old furniture pieces into modern masterpieces with the help of the Hardell Rotary Tool. Using this powerful tool, you can easily refinish any wooden object by polishing it with sandpaper attachments before giving it new life with intricate carvings and engravings.
Paint or stain these designs in vibrant colors for an eye-catching visual appeal sure to draw attention wherever placed. This is also a great way to give worn-out furniture items a second chance at life while saving money in the process!
Case Study 3: Home Accents
The Hardell Rotary Tool isn't just limited to larger decorating projects - it can also be used for smaller accents around your home as well! Use its grinding abilities to shape clay pots for plants or turn old jars into candleholders - all without having to purchase any additional tools.
Once shaped according to preference, give them some color with paint or stain before displaying them around your home as beautiful centerpieces that show off your personal style!
No matter what type of project you choose to undertake using your Hardell Rotary Tool, it is always important that safety remains a top priority when working on any DIY project involving power tools.
Conclusion
Using the Hardell Rotary Tool, you can easily transform your home décor and create custom pieces that showcase your personal style. From wall hangings to furniture upcycling projects and accent pieces, this versatile tool is an invaluable asset for any DIY enthusiast who wants to bring life into their living space without breaking the bank.
But most importantly, always remember safety first when using power tools - no project or decorating idea is worth risking injury over! With proper care and maintenance, we hope you get many years of use out of your Hardell Rotary Tool, as it helps make every room in your house a place where creativity shines through!
