Spark Your Creativity: Mother's Day Candles Ideas With Hardell Rotary Tool

Mother's Day is a special occasion to show your mom just how much you appreciate her. If you're looking for a unique and creative way to honor the matriarch of your family, why not make her something with Hardell rotary tools? With these versatile tools, you can craft beautiful candles that will be sure to put a smile on her face.
Read on for some amazing Mother's Day candle ideas that are perfect for any budget! From simple votive candles to intricate designs, there is something here for every level of crafter. Get inspired today and create a one-of-a-kind gift that she'll cherish forever!
Materials Needed For Festive Candle Engraving With Hardell Rotary Tool
Engraving candles is easy and fun with the help of a Hardell rotary tool! Here's what you'll need to get started:
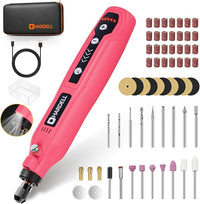
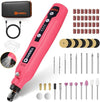
- HDRT2220 4V Mini Cordless Rotary Tool
- Candles
- Candle holder
- The sanding band, grinding, or engraving bits of the rotary tool
- Engraving stencils (optional)
- Painters tape or masking tape
- Protective eyewear
Preparation Work Before Engraving
Preparation is key to successfully engraving candles with the Hardell Rotary Tool. Before you start, make sure you have all the necessary materials and tools handy.
Clean the surface of the candle
Before engraving with the Hardell rotary tool, it is important to make sure the surface of the candle is clean and free of dirt, dust, or debris. For best results, thoroughly wipe down the wax surface with a damp cloth. Depending on the type of wax used in your candle, you may need to use a mild detergent to remove any oils or residue from its surface.
Try to avoid using solvent-based cleaners or abrasive materials as these can damage or discolor your candle.
Secure the candle in its holder
Once your candle is clean and dry, you’ll need to secure it into its candle holder. For best results, use a piece of painter's tape or masking tape to hold it firmly in place.
This will also help make sure that the candle remains still while you are engraving with your Hardell rotary tool.
Mark the design with a pencil
This will help to ensure that you are creating the desired pattern and make it much easier to achieve accurate results.
When marking out the design, pay close attention to small details and make sure each line is drawn as accurately as possible. when marking out your design, you may also want to use a stencil or template to help make the job easier.
Practice on a scrap candle
To practice engraving with a Hardell rotary tool on a scrap candle, first, select an area of the candle that is separate from the one you intend to gift your mom. You may want to practice on a small scrap piece of wax or an old candle that is no longer in use.
Make sure that you have secured it firmly in its holder.
Then, select the engraving bit of your Hardell rotary tool and set to work on creating your design. You may want to start off with a simple pattern before moving on to more intricate designs. Work slowly and carefully, paying attention to small details or lines that are easily missed.
Engrave the design onto the Candle
Once you have perfected your design on a practice candle, it’s time to move on to engraving it onto the actual gift candle. Select the appropriate engraving bit from your Hardell rotary tool and begin working on the wax surface in slow and precise movements.
As you carve out each line or shape, take care not to press too hard as this can cause damage to both the candle and the rotary tool. Take your time as you work on each detail and make sure your lines are accurate, clean, and precise.
Step-By-Step Instructions On Engraving Candles With Hardell Rotary Tool
Engraving candles with the Hardell rotary tool is a simple process that requires a few basic steps. With the right materials and a bit of practice, you'll soon be creating beautiful and unique designs for your Mother's Day gifts. Here's what you need to do:
Secure the candle
After cleaning the surface of the candle, it is important to secure it into its holder before engraving it with the Hardell rotary tool.
To do this, use a piece of painter's tape or masking tape along the circumference of the candle and its holder. This will help to ensure that the candle remains still while you are engraving.
Set up the Hardell rotary tool
When setting up the Hardell rotary tool, make sure that the grinding or engraving bit is firmly attached and that all safety features are enabled. Make sure to have eye protection, as well as gloves and a dust mask, on hand before you begin.
It is also recommended to start with a slower speed setting and gradually increase it to your desired level.
Begin engraving
Start by positioning the tip of the tool at an angle to ensure that it does not catch on any edges or ridges.
Then, begin to etch along your pencil lines with steady and even pressure. If you are satisfied with the results, move on to add more details or intricate designs.
Finishing touches
Once the design has been engraved onto the candle, it's time for some finishing touches. Start by adding a few more details or designs to make the gift even more special. If desired, you can also add color to your engraving with wax crayons or markers. This will give the finished product a vibrant and unique look.
One way to achieve even more intricate detail is by using the Hardell rotary tool to etch fine lines into the wax. When working on these smaller details, be sure to use a slower speed setting and lighter pressure so as not to break or damage the delicate wax surface of the candle.
Finally, you may want to seal your engraving with a layer of clear varnish or shellac in order to prevent discoloration over time. This will also help protect the candle from moisture and other environmental factors that could cause damage down the line.
Tips And Tricks For Festive Candle Engraving With Hardell Rotary Tool
Engraving candles with the Hardell rotary tool can be an enjoyable and creative way to show your love this Mother's Day.
With a few simple tools and easy-to-follow instructions, you can create beautiful and unique designs that will make any gift more special. Here are some tips and tricks to help you get started:
Use a stencil or template
Using a stencil or template can make it easier to create intricate patterns and designs on your candles. Be sure to choose a design that is suitable for the size of the candle so that you achieve accurate results.
Try different bits
The Hardell rotary tool comes with multiple bits that can be used for various tasks. Try out different bits to see which one produces the desired results and create unique designs for your candles.
Adjust speed settings
When setting up your rotary tool, adjust its speed settings according to the complexity of the design you are trying to achieve. It is best to start with a slower speed setting and gradually increase it once you get more comfortable with how it works.
Take safety precautions
Safety should always be the top priority when using any tools or machinery, especially when operating a rotary tool like the Hardell rotary tool. Make sure to wear protective eyewear, gloves, and a dust mask before beginning work on your candle creations!
Clean up residue & buff wax
Once you have finished engraving your festive candle design, take a moment to clean up any residue left behind from grinding or from wax particles created during the etching process.
A damp cloth should do just fine for this task, then buff out any wax particles remaining with a soft lint-free cloth for extra shine!
By following these steps and taking all necessary safety precautions, you'll soon be creating beautifully engraved candles for Mother's Day gifts that will last many years as lasting memories!
Conclusion
Creating a special, etched candle for your mom this Mother's Day is an easy and creative way to show her how much you care. With the help of the Hardell rotary tool, you can engrave intricate designs that will be sure to wow her!
Before beginning work on your masterpiece, it’s important to practice with a scrap candle first. Additionally, make sure that all safety precautions are taken and wear protective eyewear and gloves when using any tools or machinery.
After finishing your design and cleaning up residue from grinding or wax particles created during the etching process, buff out any remaining wax particles with a soft lint-free cloth for extra shine! With these tips in mind, you'll soon have beautiful candles ready to give as amazing gifts this Mother's Day!
